
My First Peep Disaster
I have to tell you about my first try at homemade peeps. It was a mess. The sugar syrup got too hot. The marshmallow never got fluffy. I ended up with sticky yellow puddles. I still laugh at that memory. But you know what? That’s how we learn. Every messy try gets you closer to something wonderful.
That’s why this matters. Making treats by hand connects us to happy moments. It’s not just about the candy. It’s about the fun of creating something playful. Your kitchen becomes a place of joy. Have you ever had a funny kitchen fail? I’d love to hear your story.
The Magic of Blooming Gelatin
Let’s talk about the secret to fluff. It’s the gelatin. You mix it with water and let it sit. This is called “blooming.” It looks weird at first, like wobbly jelly cubes. But this step is so important. It makes the marshmallow light and airy.
Fun fact: Gelatin comes from animal collagen. It’s what gives marshmallows and classic vanilla marshmallows their wonderful chew. Without it, they’d just be sweet syrup. When you add the hot sugar mix, go slow. Your patience will be rewarded with a big, fluffy, white cloud in your mixer. Doesn’t that smell amazing?
Piping Your Fluffy Friends
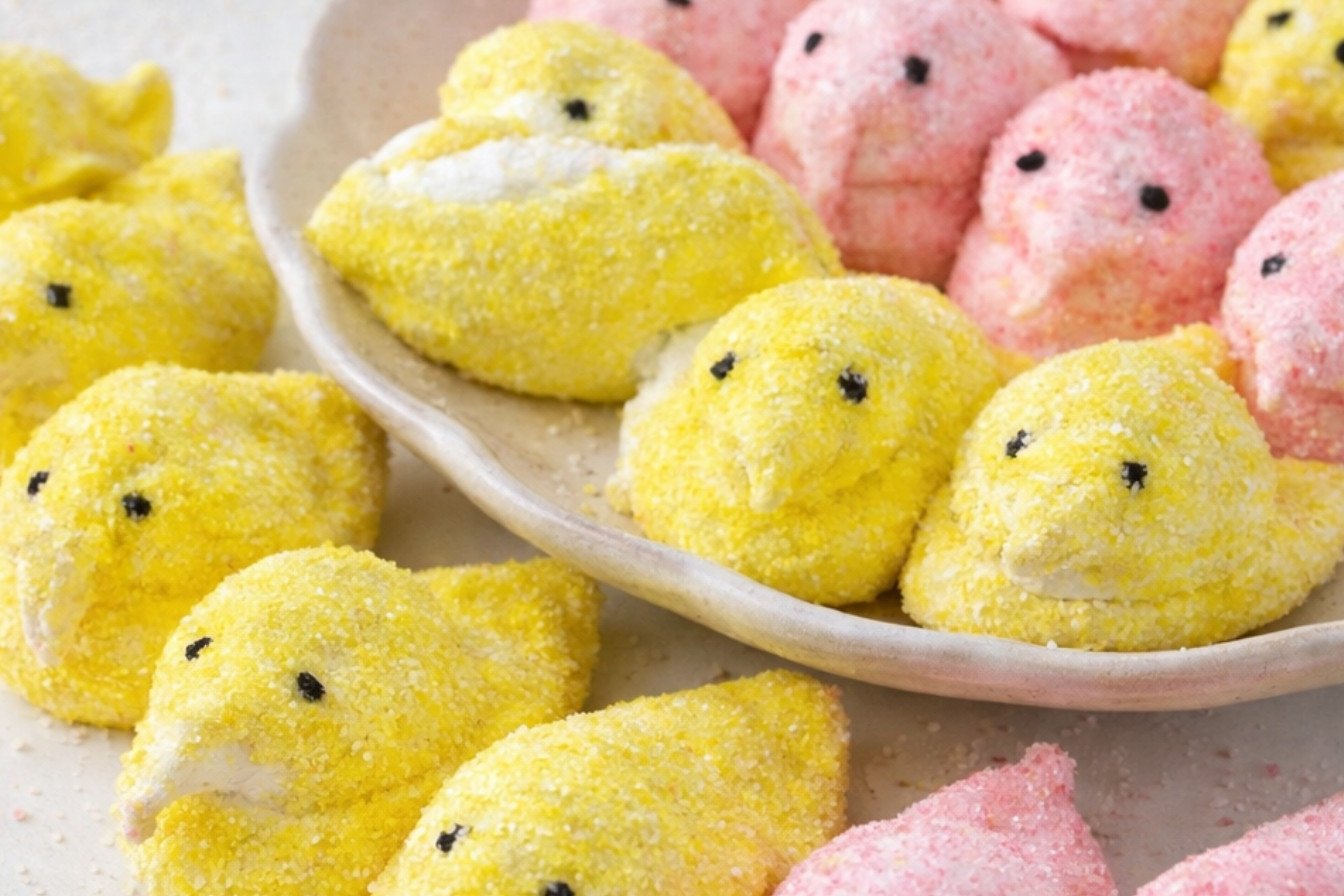
This is the fun part. Scoop your marshmallow fluff into a piping bag. Now, you’re an artist. Pipe a little oval for the body. Give it a cute tail. Then build a round head. It might feel tricky at first. That’s okay. My first peeps looked more like sleepy chicks than peeps.
Here’s a tip. Roll them in the colored sugar right away. The sugar needs the marshmallow to be sticky to cling on. If your fluff gets stiff, warm it gently. A quick 10-second zap in the microwave makes it supple again, just like when you revive mocha marshmallow delights. Do you think you’ll make yellow peeps, pink peeps, or a whole rainbow flock?
Why Homemade Tastes Different
A store-bought peep is fun. But a homemade peep is an experience. You taste the real vanilla. You feel the soft, fresh texture. It melts on your tongue differently. That’s why this matters. You control what goes in. You make them with your own hands. That love is the best ingredient of all.
The final touch is my favorite. Use a toothpick to dot on two little eyes. Suddenly, they have personality. They’re your little marshmallow friends. It reminds me of adding the finishing touches to other treats, like the zest on strawberry lemon marshmallows. Which step are you most excited to try?
Sharing the Sweetness
Let your peeps set in the fridge for two hours. This helps them keep their shape. Then, you can gently pull them apart. Or leave them in a cute little row. They are perfect for an Easter basket. They’re also wonderful on top of a cup of hot chocolate.
Making these is a sweet tradition. It’s a project that’s just right for a spring afternoon. The best part is sharing them. Seeing someone’s smile when they bite into a peep you made? That’s pure magic. What’s your favorite springtime treat to make or eat?
Instructions
Step 1: First, make your colored sugars. Put sugar in two bowls. Add pink gel to one and yellow to the other. Mix with a spoon until the color is even. I still laugh at how my fingers looked after doing this once! Set them aside for later. This step is fun and messy.
Step 2: Now, cook the sugar syrup. Combine sugar, corn syrup, and water in a pot. Heat it until it boils. Then cover it for two full minutes. (Don’t peek! The steam washes sugar crystals down.) Doesn’t that smell amazing already? This syrup is the magic start.
Step 3: While the syrup cooks, bloom your gelatin. Mix gelatin with water in your mixer’s bowl. Let it sit for 10 minutes. It will get thick and wobbly. This gives our peeps their wonderful, fluffy texture. Ready for the next part?
Step 4: Carefully pour the hot syrup into the gelatin. Mix on high speed. Watch it turn white and fluffy! It’s like a sweet cloud. Add vanilla and salt while it mixes. What do you think makes marshmallows fluffy? Share below! The whipping is my favorite part.
Step 5: Pipe your peeps onto sugar-sprinkled parchment. Pipe an oval body and a round head. It’s okay if they’re not perfect! Coat them in colored sugar right away. (Work fast so the sugar sticks.) Let them set in the fridge. Finally, give them eyes with a toothpick and black gel.
Creative Twists
Make bunny peeps by piping long ears instead of a beak.
Use flavored extracts like lemon or almond for a surprise taste.
Roll them in sprinkles instead of sugar for a confetti look.
Which one would you try first? Comment below!
Serving & Pairing Ideas
Nestle your peeps on a bed of green coconut “grass.” They look so happy there! You can also stick one on the rim of a rich hot chocolate mug. For a real treat, sandwich two peeps between graham crackers with a little chocolate. Which would you choose tonight?

Keeping Your Peeps Perfect
Let’s talk about storing these sweet treats. Fresh marshmallow peeps are best kept in an airtight container. Layer them with parchment paper so they don’t stick. They will stay soft for about a week on your counter.
You can also freeze them for a month. I remember my first batch of homemade marshmallows. I was so proud I froze a few to save. They thawed perfectly soft weeks later! This matters because it lets you make joy ahead of time. No last-minute rush before your Easter gathering.
To reheat, never use a microwave. It will melt them into a puddle. If they get a bit hard, let them sit with a slice of bread in the container. The bread’s moisture will soften them up overnight. Have you ever tried storing them this way? Share below!
Little Fixes for Big Smiles
Home cooking has tiny troubles. But every problem has a simple fix. First, if your sugar syrup gets grainy, your sugar wasn’t fully dissolved. Just stir it gently at the start until it looks clear.
Second, if your marshmallow fluff is too runny, keep mixing. I once stopped my mixer too soon. The peeps spread like pancakes! Mixing to stiff peaks matters. It gives you the fluffy texture everyone loves.
Third, if the sugar won’t stick, you waited too long. Coat those peeps right after piping. This small step matters for that classic, sweet crunch. Which of these problems have you run into before?
Your Quick Questions, Answered
How to make homemade Easter marshmallows
You start by making a hot sugar syrup. Then you bloom gelatin in water. Whip the syrup into the gelatin until it is very fluffy and white. This creates the base for all sorts of shapes, like the classic marshmallow delights. Pipe it onto a sugar-coated pan and let it set. The process is fun and very rewarding.
What are the ingredients for Easter marshmallows
You need granulated sugar, light corn syrup, water, and gelatin. Vanilla and salt are for flavor. Powdered sugar and more granulated sugar are for dusting and coating. Gel food dyes in yellow, pink, and black give them the Easter peep colors. That’s it! Simple pantry items can create something magical.
Can you color homemade marshmallows for Easter
Yes, you absolutely can! The best way is to color the sugar you roll them in. Mix gel food dye with granulated sugar until it’s even. You can also add a drop of dye to the marshmallow fluff before piping. For a fun fact, gel dye gives brighter color than liquid. It won’t thin out your fluffy mixture.
How to shape marshmallows into Easter bunnies
Use a piping bag with a large round tip. Pipe an oval for the body, pulling to make a little tail. Then pipe a circle on top for the head. Gently pull the bag to form a face and beak. It takes practice, but it’s like drawing with frosting! Refer to pictures in the recipe for a helpful guide.
Tips for making marshmallow Peeps at home
Work quickly once the fluff is ready. Coat the shapes in colored sugar immediately. If the fluff gets too stiff to pipe, warm it slightly. A ten-second burst in the microwave can help. Let them set fully in the fridge before adding the cute black eyes with a toothpick. This ensures they hold their perfect shape.
How long do homemade Easter marshmallows last
Stored in an airtight container, they last about a week at room temperature. You can freeze them for up to a month for longer storage. They are best enjoyed fresh when they are at their most soft and fluffy. Try different flavors like these strawberry lemon marshmallows for a twist. Which tip will you try first?
From My Kitchen to Yours
I hope you have the best time making these peeps. The mess and the laughter are part of the fun. Seeing those little yellow and pink faces lined up is pure joy.
I would love to hear about your baking adventure. Did your family love them? Did you get creative with the shapes? Share your story with me in the comments below. Have you tried this recipe?
Happy cooking!
—Clara Cooper

Easter Marshmallows Made at Home
Description
Make your own festive Easter treats with these Easy Homemade Marshmallow Peeps. Fun to shape and coat in colorful sugar.
Ingredients
Instructions
- To prepare the colored sugars used to make these peeps, place 2 cups of granulated sugar in one bowl with the yellow food dye and the other 2 cups of granulated sugar in another bowl with the pink food dye. Use your hands with gloves or a spoon to evenly coat all of the sugar with food gel until you reach a consistent color and a shade that you like. Set both aside.
- In a medium-sized sauce pot, combine the sugar, corn syrup, and water. Give it a little stir to make sure that no sugar is stuck to the bottom and that the mixture is evenly distributed throughout the pot.
- Place this mixture over medium-high heat until it begins to boil. As soon as the mixture starts to boil, reduce to medium heat place the lid on, and cover for 2 minutes. Do not lift the lid during the 2 minutes.
- Take the cover off after 2 minutes and place a thermometer inside the pot. Keep the mixture over medium heat until the thermometer reads 242 degrees F. – 245 degrees F.
- While you wait for the mixture to reach the right temp. Place the gelatin and water in the bowl of a stand mixer fit with a whisk attachment. Give the water and gelatin a little mix with a spoon or silicone spatula to ensure that it is combined. Let the gelatin mixture bloom for at least 10 minutes.
- When the sugar mixture reaches the correct temp, take it off the heat and let the bubbles subside.
- After the gelatin has bloomed, slowly add the sugar to the gelatin mixture in the stand mixer while mixing at medium to high speed. Add the hot sugar mixture slowly on one side of the bowl. If you add this all at once it will scorch the gelatin.
- Once all of the sugar mixture has been added, increase the speed to high until the mixture looks white and has doubled in size. Mix this for 3-5 minutes. Add in the vanilla and salt while the mixer is still going.
- While the mixture is still coming together in the stand mixer, prepare two cookie sheets by placing parchment paper on each one then sifting sugar over the entire surface making sure to coat it gently. Sprinkle each colored sugar on top of both prepared cookie sheets, yellow on one, and pink on the other. Set aside.
- Add another 2-3 minutes if the mixture hasn’t doubled or tripled in size or looks thin.
- Once the marshmallow is ready, scoop it into a piping bag fit with a large round tip.
- One at a time, pipe an oval shape pulling the piping bag quickly to break the streak to make the little curled tail. Feel free to use a toothpick to help break the pipe if this helps. Pipe 5-10 oval shapes next to each other touching. Use the pictures as guides. Next, pipe a circle the same width as the thickest part of the oval working your way up to create a pyramid-like shape then rotate your piping bag about 90 degrees to pull away from the peep to create the face and beak. Remember to refer to the pictures above to help you during this step.
- Coat the marshmallow peeps in the colored sugar accordingly almost immediately after piping, otherwise the sugar won’t stick as well. Continue these steps until all of the marshmallow is used up. If the piping takes longer and the marshmallow starts to thicken and become harder to pipe, place the marshmallow in a large bowl and microwave for 10 seconds at a time mixing between each time just to warm it up and make the mixture more supple and easier to pipe.
- Let the marshmallow peeps set in the fridge for about 2 hours. Then use a toothpick dipped in black food gel to dot little eyes on each side of the peeps.
- Separate the peeps or keep them in groups and enjoy!
Notes
- For best results, work quickly when piping and coating with sugar. The marshmallow mixture sets as it cools. Store in an airtight container at room temperature for up to a week.