
My First Galette Panic
The first time I made this, I forgot to cut the slits. I just folded the edges over like a tight blanket. The pastry bubbled up in the oven and looked like a grumpy pillow. I still laugh at that. But the berries tasted amazing anyway. So I learned to snip those little lines around the edge. It lets the steam escape and makes the pastry curl up like flower petals.
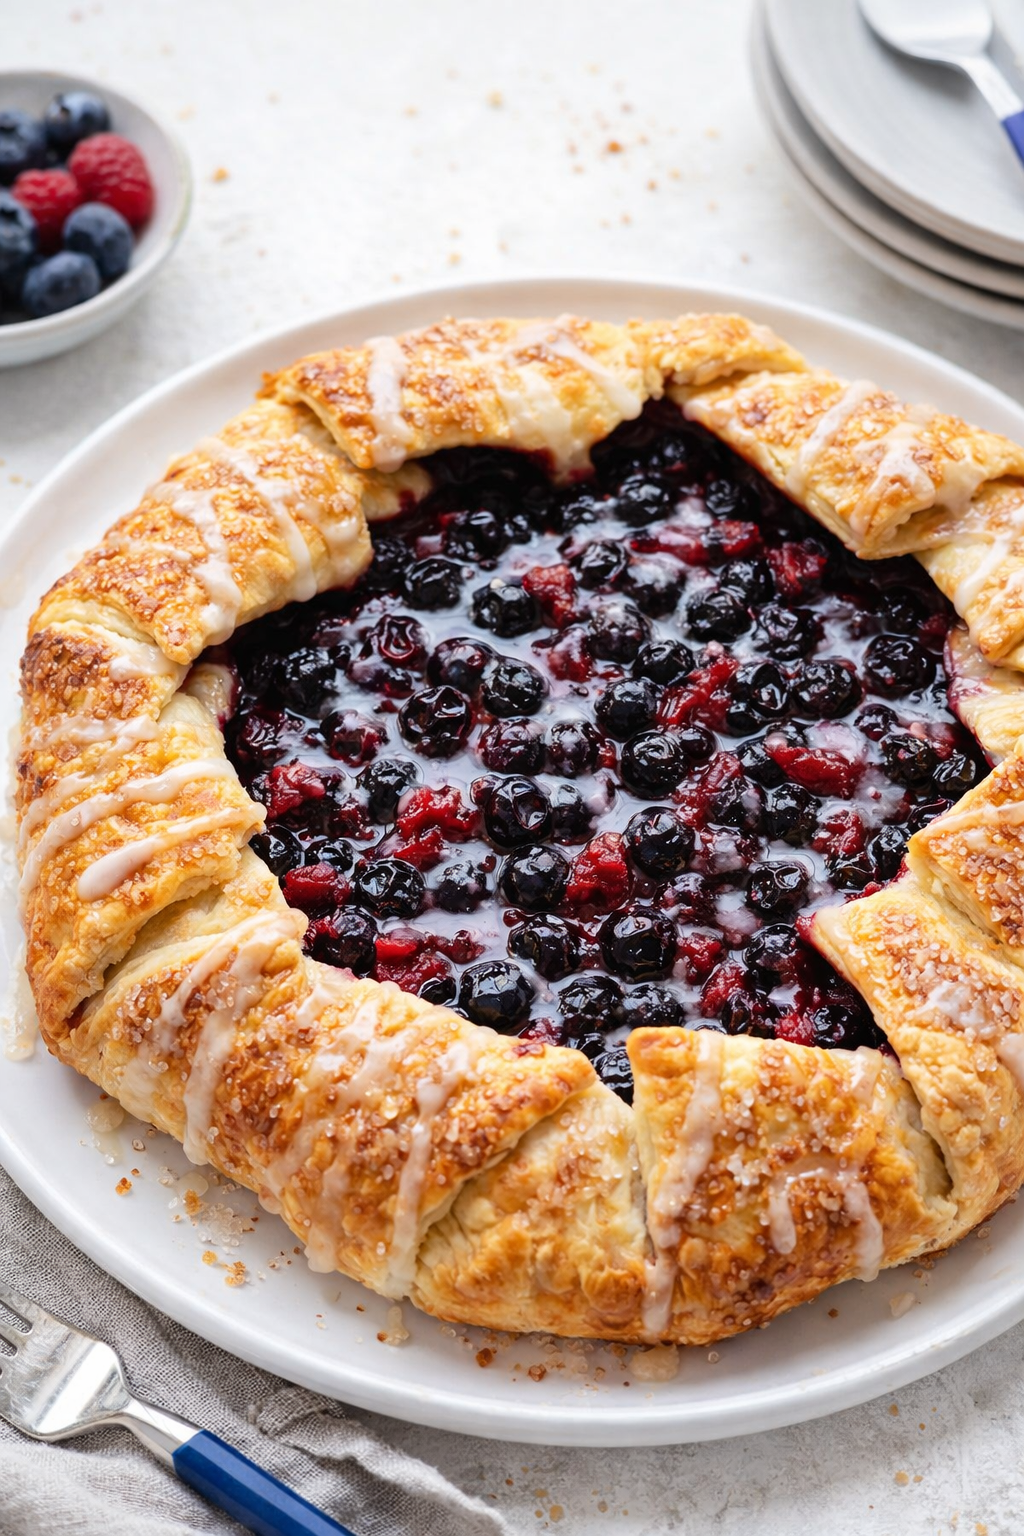
Doesn’t that smell amazing? When lemon zest hits warm berries, your whole kitchen wakes up. Why this matters: cutting those slits is not just for looks. It keeps the pastry from getting soggy. Also, it helps the edges get crispy and golden. Have you ever tried a dessert that looked perfect but was doughy underneath? That is what we are avoiding here.
What Berries Tell Us
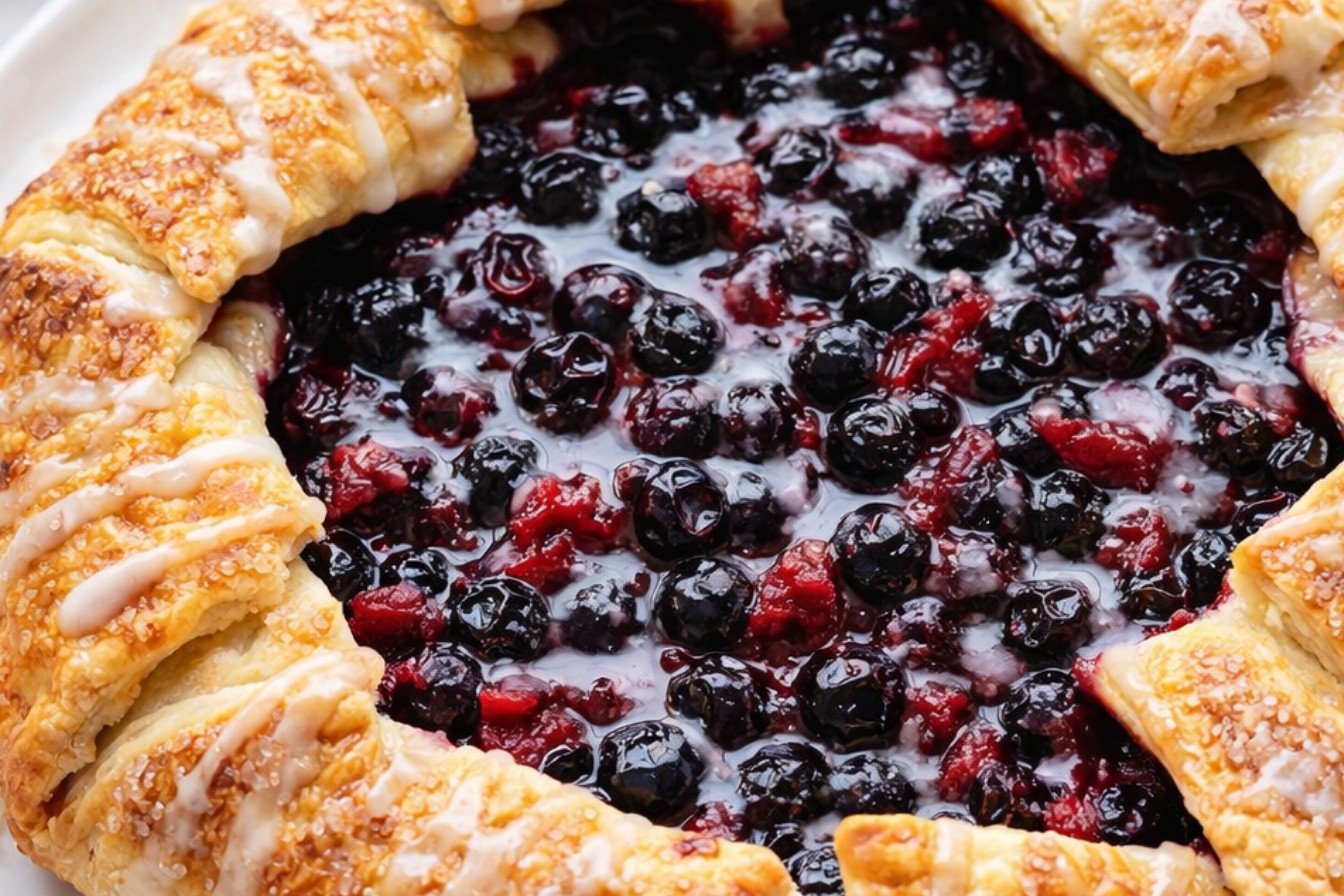
You can use any berries you have. I used blueberries and strawberries. I cut the strawberries into tiny pieces so they matched the blueberries. That is important. When everything is the same size, they cook evenly. No big mushy spots. No raw hard bits.
Why this matters: fresh berries are sweet, but they need a little help. The cornstarch and sugar work together. They make a thick, glossy syrup that hugs the fruit. A rustic butternut squash galette uses the same idea, just with savory fillings. Here, the lemon juice cuts the sweetness just enough. It wakes up your tongue. What is your favorite berry to bake with? I bet you have a story about picking them.
A Little Butter Magic
Before you slide the galette into the oven, dot the top with small pieces of butter. I use about one tablespoon. It sounds like a tiny amount, but it does big work. The butter melts into the berries and makes the filling taste rich and smooth. It also helps the edges brown nicely.
My grandma used to say butter is a peacemaker. It brings all the flavors together. That is still true. Have you ever added butter to fruit before baking? If not, try it next time. You will taste the difference. A mushroom and leek galette also uses a butter trick. Butter does not care if your filling is sweet or savory.
The Egg Wash Secret
Whisk one egg with a splash of water. Brush it only on the pastry edges. Do not brush the berries. This gives the crust a shiny, golden look. Then sprinkle coarse sugar on the wet egg wash. It sticks better that way.
When the galette bakes, the sugar sparkles like little crystals on the crust. It is not just for decoration. The sugar gives a tiny crunch. It makes the soft, flaky pastry more fun to eat. Why this matters: a shiny crust tells your brain this is special food. It changes how you taste it. I once used brown sugar instead of coarse sugar by accident. It was still yummy, just not as pretty. A potato and blue cheese tart uses a similar egg wash for that same golden glow.
Waiting for the Glaze
After the galette comes out of the oven, you must let it cool almost all the way. I know it is hard. Your house smells like a bakery. Your spoon is ready. But if you pour the glaze on a hot galette, it melts into a puddle. You lose that pretty white drizzle.
The glaze is simple: powdered sugar and lemon juice. Start with a little juice, then add more until it is thin enough to drizzle. I use a fork to flick it over the top. It looks fancy, but it takes two seconds. A rustic apple slab tart uses a similar glaze. Do you like your glaze thick or runny? There is no wrong answer. It is your kitchen.
Fun Fact About Puff Pastry
Fun fact: Puff pastry has over 70 layers of butter and dough. Each layer puffs up separately in the oven. That is why it gets so flaky and light. Store-bought sheets save you the trouble of rolling all those layers yourself.
You can keep puff pastry in your freezer for months. Just thaw it in the fridge overnight. Then roll it out gently. Do not press too hard or you squish the layers. I always keep one sheet hidden for emergencies. A sweet tooth emergency counts. A high-protein breakfast bowl is great, but sometimes only pastry will do.
How to Serve and Share
This galette is best warm, but not hot. Serve it on a plate with a scoop of vanilla ice cream. The cold cream melts into the warm berries. It is like a hug for your mouth.
You can also eat it for breakfast the next day. I will not tell anyone. Just reheat it in a low oven for five minutes. The glaze gets soft again. What is your favorite way to enjoy leftover dessert? I love hearing these little kitchen secrets. They feel like whispers between friends.
Instructions
Step 1: Preheat your oven to 400 degrees. Line a cookie sheet with parchment paper. (I once forgot the parchment paper and spent an hour scrubbing. Learn from my mess!) Unroll your puff pastry sheet right in the center of the pan.
Step 2: Grab a medium bowl and toss in 3 cups of fresh berries. Chop strawberries so they are all about the same size as blueberries. Add 1/4 cup sugar, 2 teaspoons cornstarch, lemon zest, and 1 tablespoon lemon juice. Stir gently until every berry is coated. What berry are you using today? Share below!
Step 3: Pour the berry mixture into the center of the puff pastry. Leave a 2-inch border of clean pastry all around the edges. Use kitchen shears to cut small slits 2 inches apart along that edge. This helps you fold the pastry up easily for that rustic look.
Step 4: Fold the edges of the pastry up over the berries. Try to overlap them a little if you can. Whisk one egg for an egg wash and brush it on the folded pastry edges. Sprinkle coarse sugar over the brushed edges for a lovely crunch.
Step 5: Dot the top of the berries with small pats of butter, about 1 tablespoon total. Bake for 35 to 40 minutes. Look for the center to thicken and the edges to turn golden brown. (If the edges brown too fast, just lay a piece of foil loosely on top.)
Step 6: Let the galette cool almost completely before adding the glaze. For the glaze, stir 1/3 cup powdered sugar with 1 tablespoon lemon juice. You can swap the lemon juice for vanilla and a splash of milk if you prefer. Drizzle it over the cooled galette in zigzags.
Creative Twists
…Swap the berries for sliced peaches and raspberries for a sunny summer twist.
…Add a teaspoon of fresh thyme or basil to the berry mix for a secret herby pop.
…Spread a thin layer of almond paste under the fruit for a nutty surprise.
Which one would you try first? Comment below!
Serving & Pairing Ideas
Step 7: Serve this warm with a big scoop of vanilla ice cream melting over the side. For a fancy touch, dust the plate with powdered sugar and add a sprig of mint. You can also pair it with a dollop of lightly sweetened whipped cream. It tastes amazing next to a cup of hot tea on a cool evening. Try serving it alongside a rustic butternut squash galette for a sweet and savory dinner party. You can also check out this mushroom leek galette for a different flavor. For a fun twist on a classic, try this savory potato and blue cheese tart. And if you are craving something fruity, this apple slab tart is a real treat. Which would you choose tonight?
Storing Your Berry Galette the Right Way
Let me tell you about the first time I made this galette. I was so proud of those golden, buttery edges. I wrapped it in foil and shoved it in the fridge, only to find a soggy mess the next morning. That taught me a lesson.
For the fridge, let the galette cool completely first. Then place it on a plate and cover it loosely with wax paper. Do not seal it tight. You want the crust to stay crisp, not steamy. This works for up to two days.
For the freezer, I like to batch-cook two galettes at once. Bake one for now and freeze the other before baking. Wrap the unbaked galette in plastic wrap, then foil. It keeps for a month. When you are ready, bake it straight from frozen. Just add ten minutes to the time.
Reheating is simple. Pop a slice in a 350-degree oven for five minutes. The crust gets flaky again. The berries stay juicy. Do not use the microwave. It turns the pastry into a sad, chewy pancake. Have you ever tried storing it this way? Share below!
Why does this matter? Good storage means you can enjoy a sweet treat any night of the week. It also saves you from wasting food. That feels good for your wallet and your time. For more savory ideas, check out this rustic butternut squash galette for dinner.
Three Common Galette Problems and Easy Fixes
I remember when my crust always turned out pale and soft. I wanted that golden crunch. The fix was simple: do not skip the egg wash. That egg and sugar coating gives the pastry a beautiful color and a little crackle. Trust me on this.
Another problem is a soggy bottom. The berries release juice as they bake. To fix this, toss your berries with cornstarch before adding them to the pastry. The cornstarch soaks up the extra liquid. It is like a shield for your crust. I also add a sprinkle of cornstarch right on the pastry before the berries go on. Double protection.
The third issue is overflowing filling. I once had berry juice drip all over my oven rack. It made a smoky mess. Now I always use a rimmed baking sheet with parchment paper. The edges catch any spills. And I do not overfill the galette. Leave those two inches of space. Which of these problems have you run into before?
Why does this matter? Fixing these small problems builds your confidence in the kitchen. You learn how ingredients behave. And your dessert will look as good as it tastes. That is a proud feeling. For another great pastry idea, try this mushroom and leek galette.
Your Quick Questions, Answered
Can I use frozen berries for this recipe?
Yes, you can use frozen berries, but you need to handle them with care. Frozen berries release more water than fresh ones. Thaw them first in a colander. Let the extra liquid drip away for ten minutes. Then pat them dry with a paper towel. After that, toss them with the sugar and cornstarch as written. You might want to add an extra teaspoon of cornstarch to soak up the remaining moisture. This keeps your crust from getting soggy. I have done this many times, and it works well, especially in winter when berries are not in season. For a cozy cold-weather twist, you can also mix in some sliced apples. This rustic apple slab tart is a good companion recipe.
How do I prevent the galette crust from getting soggy?
The secret is cornstarch and a hot oven. Cornstarch thickens the berry juices as they heat up. This stops the liquid from soaking into the pastry. I also brush the puff pastry with a little egg white before adding the berries. That creates a thin barrier. Bake the galette at 400 degrees, which is hot enough to set the crust quickly. Do not lower the temperature. And let the galette cool completely on the baking sheet before moving it. The steam needs to escape. If you rush this step, the bottom will soften. I once learned this the hard way when my galette fell apart on the serving plate. Now I wait patiently. For a savory version that stays crisp, look at this potato and blue cheese tart.
What is the best type of pastry to use for a quick galette?
For speed and ease, use store-bought frozen puff pastry. Look for the all-butter kind if you can find it. It has a richer flavor and flakier layers. The frozen sheets are already rolled out. You just thaw them in the fridge for about 30 minutes. Do not use pie crust from a tube. It is too thick and does not get as crispy. Puff pastry gives you that light, airy texture with almost no work. I always keep a box of it in my freezer for last-minute desserts. It is my little secret weapon. If you want to try a different style, a honey garlic skillet chicken is not a dessert, but it uses the same quick-thinking method.
Do I need to pre-cook the berries before assembling the galette?
No, you do not need to pre-cook the berries. That is the beauty of this recipe. The berries cook right inside the pastry as it bakes. The heat turns them soft and jammy. Pre-cooking would make them too mushy and watery. You would lose that fresh berry pop. Just toss the raw berries with sugar, cornstarch, lemon zest, and lemon juice. Then pile them onto the puff pastry. The oven does all the work. This saves you time and a dirty pot. It also keeps the berry flavor bright and true. I love that about this simple dessert. For a savory dish with a similar no-fuss approach, try these savory herb biscuits.
Can I add sugar or a sweetener to the berries?
Yes, you can adjust the sweetness however you like. The recipe uses a quarter cup of granulated sugar. If your berries are very tart, add an extra tablespoon. If they are sweet, use a little less. You can also swap in honey, maple syrup, or a sugar substitute like stevia. Just remember that liquid sweeteners add moisture. If you use honey, reduce the lemon juice by half. Or add another teaspoon of cornstarch to balance it out. I have used brown sugar before, and it gives a nice caramel flavor. The choice is yours. Taste a berry before you start. That is the best guide. For a breakfast twist on sweetness, check out this healthy protein breakfast bowl.
How do I store leftovers of a berry galette?
Let the galette cool completely on the counter. Do not cover it while it is still warm. That traps steam and ruins the crust. Once cool, place it on a plate and cover it loosely with wax paper or a paper towel. Store it in the fridge for up to two days. For longer storage, wrap individual slices in plastic wrap and put them in a freezer bag. They keep for one month. To reheat, put a slice in a 350-degree oven for five to seven minutes. The crust gets flaky again. Do not use the microwave. It will make the pastry rubbery. I always reheat two slices at once, because one is never enough. Which tip will you try first?
A Final Word from Elowen Thorn
My grandmother used to say that the best desserts are the ones you share. I think she was right. This berry galette is special because it is easy enough for a beginner and pretty enough for company. It tastes like summer, even in the middle of winter.
I hope you try it soon. And I hope you make a little mess in your kitchen. That is where the best memories start. Fun fact: Puff pastry was invented in France over 400 years ago, and it still makes people smile today.
Have you tried this recipe? Tell me how it turned out. Did you use strawberries or blueberries? Did you add ice cream on top? I would love to hear your story. Drop a comment below and say hello. Happy cooking!
—Grace Ellington.

Quick Berry Galette in Fifteen Minutes
Description
A quick and rustic galette made with fresh berries and flaky puff pastry, finished with a lemon glaze.
Ingredients
Instructions
- Preheat the oven to 400 degrees. Line an edged cookie sheet with parchment paper. Place and center the unrolled puff pastry sheet on the lined cookie sheet.
- In a medium-sized bowl, combine the prepared berries, 1/4 cup granulated sugar, 2 tsp cornstarch, lemon zest, and 1 tbsp lemon juice. Mix well until all the berries are coated.
- Carefully pour prepared berries out into the center of the puff pastry sheet. Make sure to leave 2 inches of space around all the edges. Use kitchen shears or a knife to cut slits 2 inches apart along the edge of the puff pastry. Fold up the edges, trying to overlap a little if possible.
- Next, whisk up the egg to make an egg wash. Brush the edges of the pastry with the egg wash, and then sprinkle with the coarse sugar. Add small dollops of the 1 tbsp butter on top of the berry mixture.
- Place in oven for 35-40 minutes or until the center is thickening and edges are nicely browned. If edges start to get more than browned, you can lightly place a piece of foil over the dessert to finish cooking. Remove from oven and allow to cool almost completely before adding the glaze.
- Make the GLAZE: In a small bowl, stir or whisk together the powdered sugar and fresh lemon juice. I used 1/3 cup powdered sugar and about a tbsp of lemon juice. If you prefer, you can use vanilla and a little milk in place of lemon juice.
- Serve as is or with a scoop of vanilla ice cream. Enjoy!
Notes
- If edges start to brown too quickly, loosely cover with foil while baking. For a dairy-free version, use a vegan puff pastry and substitute butter with coconut oil.