
My Kitchen Table Memory
Every spring, my mom would make her Italian Easter Bread. The whole house smelled of orange zest and yeast. I loved watching her twist the dough into beautiful braids. She always said the bread was a circle of love for our family table.
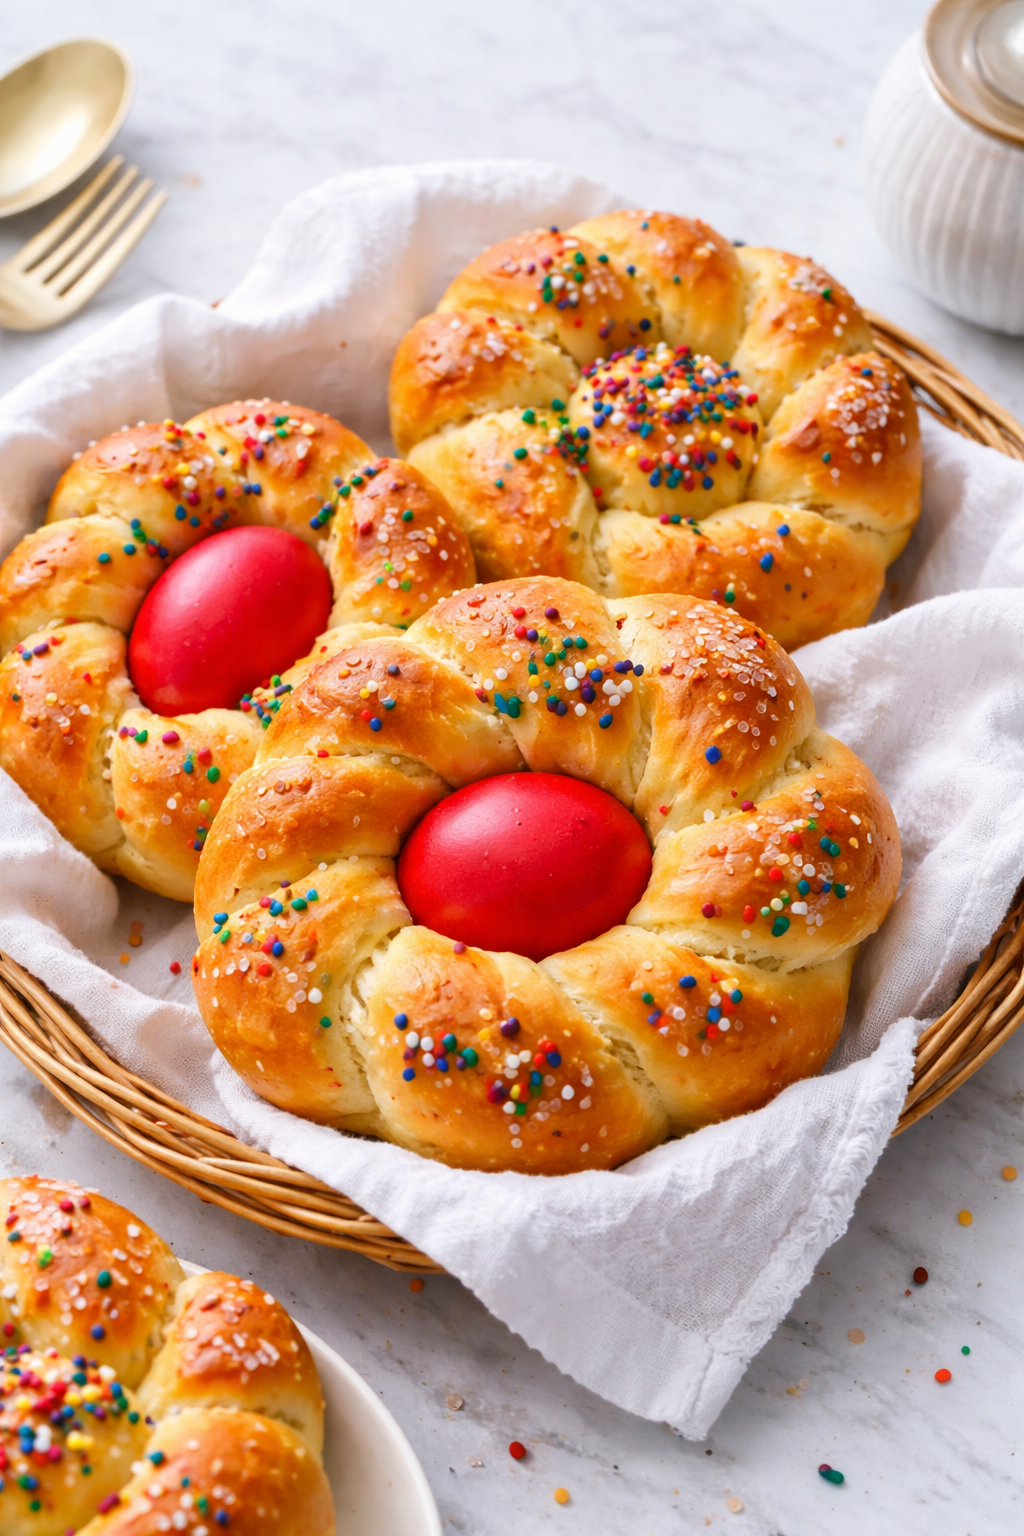
We would press raw, dyed eggs right into the dough before baking. It felt like magic. The eggs cook inside the warm, sweet bread. This tradition, called Pane di Pasqua, is a happy sign of new life. It matters because it turns simple baking into a family story. Do you have a special food you make every spring?
Why This Bread Feels Special
This isn’t everyday bread. It’s an enriched bread dough. That means it has butter, eggs, and milk. These ingredients make it soft, sweet, and rich. It’s a treat for a celebration.
I still laugh at that time I used too much flour. The bread was as hard as a rock! The lesson? Add flour slowly. You want a soft, slightly sticky dough. This matters because gentle handling makes the bread tender. For a different spring treat, try this fun Easter Bunny Bait snack mix. It’s no-bake and perfect for kids.
The Joy of Shaping Your Loaves
Shaping the braided Easter bread is the best part. You roll the dough into ropes. Then you twist two together and form a circle. It’s easier than it looks, I promise!
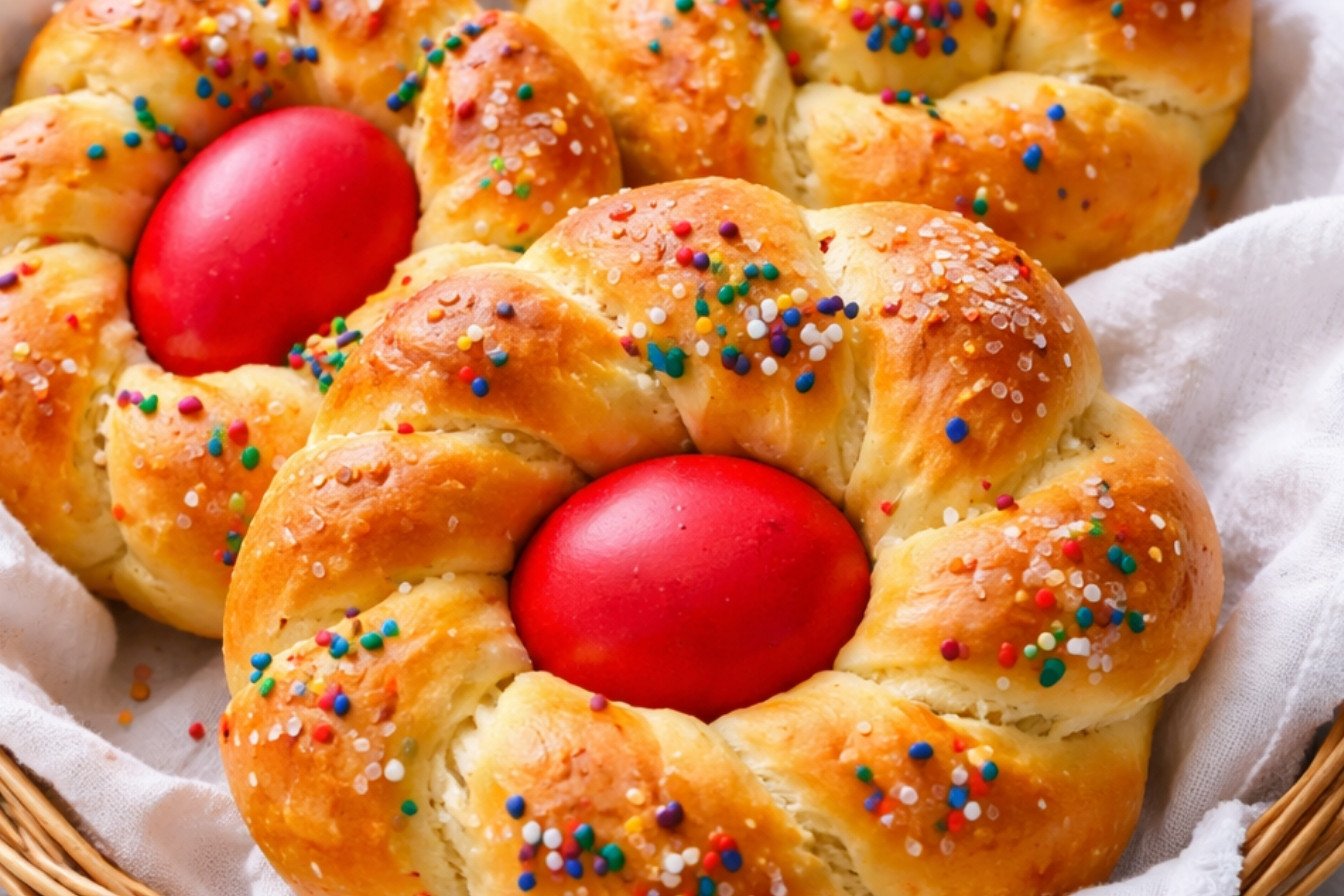
Placing the colored egg in the center is my favorite step. It makes each loaf unique. *Fun fact*: the egg in this Easter bread with eggs is a symbol of rebirth. It’s a quiet, tasty part of Italian Easter traditions. What color eggs will you use in your homemade Easter bread?
Baking Fills The House With Love
While the bread bakes, the smell is amazing. It’s sweet and warm. That smell is my favorite memory of spring. It tells everyone that a holiday is coming.
Let the bread cool before you add the glaze. A simple mix of sugar and milk makes it pretty. This Easter bread recipe is a wonderful spring baking project. It matters because making food by hand is a gift of time. While you wait for it to bake, you could plan an easy baked ham for your big meal.
Carrying On The Tradition
I make this bread every year now. It connects me to my mom and her kitchen. Traditional Italian baking is about sharing these recipes. It keeps stories alive.
This bread is perfect for a Sunday breakfast or your Easter table. Serve it with butter and jam. For a savory side, I love this hummus with lamb recipe. Do you think you’ll try making this Pane di Pasqua this year? I hope you do. It’s a delicious way to make a new memory.
Instructions
Step 1: First, let’s wake up the yeast. Warm your milk until it feels like a nice bath. Mix a cup of flour with sugar and yeast. Pour in half the warm milk. Let it sit for 10 minutes. It will get all puffy and happy. This starts our lovely Enriched bread dough for this Italian Easter Bread.
Step 2: Now, add the rest of the milk, eggs, soft butter, and salt. Mix in more flour until a shaggy dough forms. Knead with a dough hook for a few minutes. (Tip: If it sticks to the bowl, add a bit more flour.) This Pane Di Pasqua dough will be soft. Do you like orange or lemon zest in your Easter bread recipe?
Step 3: Turn the dough onto a floured counter. Knead by hand for a full minute. Feel it become smooth and elastic. This is the heart of Traditional Italian baking. Now is the time to gently knead in dried fruit, if you like. I always add golden raisins for a sweet surprise.
Step 4: Let the dough rise in a greased bowl. Cover it with a towel. Find a warm spot for about an hour and a half. It will double in size! This wait is part of the fun for Spring baking recipes. While you wait, you could plan your Easter dinner menu.
Step 5: Gently punch the dough down. Divide it and roll pieces into long ropes. Twist two ropes together to make a braid. Form the braid into a circle for your Braided Easter bread. Tuck the ends under neatly. Place them on a baking sheet to rise again.
Step 6: Preheat your oven. Brush each loaf with a simple egg wash. This gives a beautiful golden shine. Now, carefully nestle raw, dyed eggs in the centers. This makes the classic Easter bread with eggs. What color eggs will you use? Share below! It’s my favorite part of Italian Easter traditions.
Step 7: Bake until golden and your kitchen smells amazing. Let the Homemade Easter bread cool. You can drizzle with a sweet glaze and sprinkles. I love the extra sweetness. This Pane di Pasqua is a celebration of spring. Enjoy your beautiful creation with a glass of festive punch.
Creative Twists
Citrus Sunshine: Use both lemon and orange zest in the dough. It smells like a spring garden.
Sweet Almond Twist: Swap the anise extract for almond. It gives a gentle, nutty flavor.
Mini Loaf Love: Make small, individual braided circles. Perfect for each person at your table.
Which one would you try first? Comment below!
Serving & Pairing Ideas
Serve your Italian Easter Bread warm with soft butter and honey. It’s perfect for a special breakfast. For an Easter brunch, pair it with fresh fruit and a savory dish like deviled eggs. You can also enjoy a slice in the afternoon with a cup of tea. This sweet, enriched bread is a wonderful end to any spring meal. Which would you choose tonight?
Keeping Your Easter Bread Fresh
Let’s talk about storing your beautiful Italian Easter Bread. Once cool, wrap it tightly in plastic. It will stay soft on the counter for two days. For longer keeping, slice and freeze it in a bag.
You can reheat slices right from the freezer. Just use your toaster or a warm oven. I once thawed a whole loaf on my sunny windowsill. It was perfect by afternoon tea time.
Batch cooking this Easter bread recipe saves so much time. Make the dough and shape your braids a day ahead. Let them rise slowly in the fridge overnight. This matters because it makes holiday mornings calm and sweet.
Have you ever tried storing it this way? Share below!
Simple Fixes for Common Bread Troubles
Sometimes our baking has little hiccups. Do not worry. Here are three easy fixes. First, if your dough won’t rise, check your yeast date. Your liquid must be warm, not hot. I remember when I used boiling milk. My yeast took a very long nap!
Second, if your braided Easter bread browns too fast, tent it with foil. This protects the top. Third, if the bread feels dense, you may have added too much flour. This enriched bread dough should be a little sticky.
Fixing these issues builds your confidence. It also makes your Homemade Easter bread taste and look its best. Good flavor comes from patience and practice. That is the heart of traditional Italian baking.
Which of these problems have you run into before?
Your Quick Questions, Answered
What is the traditional name for sweet braided Easter bread?
Its traditional name is Pane Di Pasqua. That is Italian for “Easter Bread.” You might also hear it called “Pane di Pasqua all’Uova.” This means Easter bread with eggs. It is a cherished part of Italian Easter traditions. Families make it to celebrate spring and new life.
How do you make sweet braided Easter bread from scratch?
You start by blooming yeast in warm milk and sugar. Then mix in flour, eggs, butter, and zest. Knead into a soft, enriched bread dough. Let it rise, then braid into circles. Add raw dyed eggs in the center before baking. The result is a beautiful, sweet homemade Easter bread. It is a wonderful spring baking project.
What are the variations of sweet braided Easter bread in different cultures?
Many cultures have their own version. Greek Tsoureki is similar, often flavored with mahleb. Polish Babka is a tall, cake-like bread. Russian Kulich is baked in a tin and iced. Each recipe uses rich doughs with eggs and butter. They are all special spring baking recipes for the holiday season.
Why do we put eggs in sweet braided Easter bread?
The eggs are powerful symbols. They represent new life and resurrection. Baking them into the braided Easter bread is an old custom. The raw eggs cook right in the oven with the loaf. *Fun fact: the eggs are usually dyed red first, symbolizing the blood of Christ.* This makes a stunning centerpiece for your Easter table.
Can you make sweet braided Easter bread ahead of time?
Yes, you can! This is a great time-saver. You can prepare the dough and shape the braids. Cover them tightly and let them rise slowly in the refrigerator overnight. In the morning, let them warm up, add your eggs, and bake. This makes your Italian Easter Bread fresh for breakfast or brunch with little fuss.
What is the significance of braided Easter bread?
The braid has deep meaning. It often represents the Holy Trinity in Christian faith. The circular shape symbolizes eternal life and unity. Making this braided Easter bread connects us to generations of bakers. It is a delicious piece of living history and traditional Italian baking shared with family.
Which tip will you try first?
From My Kitchen to Yours
I hope you feel inspired to try this Pane Di Pasqua. Baking it fills your home with the most wonderful smell. It is a tradition filled with love and hope. I would love to hear about your baking adventure.
Have you tried this recipe? Tell me all about it in the comments. You can share a photo or your own family twist. Maybe you served it with a special side dish. I read every single note from you.
Happy cooking!
—Clara Cooper

Sweet Braided Easter Bread
Description
A beautifully braided, sweet, and soft Easter bread, perfect for a festive brunch or celebration.
Ingredients
Egg Wash
To decorate
Glaze (Optional)
Instructions
- Bloom Yeast/ Make Quick Sponge: Warm the milk to 110°F or just warm to touch. Make sure that the eggs and butter are at room temperature. Take 1 C flour and 1/4 C sugar in the mixing bowl. Stir to combine. Sprinkle the yeast on top and pour about 1/2 of the milk. Mix and set aside for 10 minutes. The mix would have visibly puffed up by then.
- Knead With Stand Mixer: Add the remaining milk, eggs, butter, salt, and 2 1/2 C flour to the bowl. Attach the dough hook and stir to combine for 30 seconds. Increase speed to low and knead for 2 minutes scraping down the sides in between. The dough will be very sticky. After 2 minutes of kneading if the dough is still sticking to the bowl, turn off the machine and add the remaining flour. Turn the machine back on and add the essence and zest. Knead for 2 to 3 minutes. Turn the dough out to a floured work surface and knead by hand for about 1 minute. If adding dry fruit do it at this time. Form into a smooth ball.
- Knead By Hand (Alternative): Mix flour, salt, and butter into a pile on a well-floured kneading surface. Make a well in the middle and add the yeast mix. Beat the egg a little and add to the mix. Slowly incorporate the flour into the wet mix in the middle adding as much of the milk as necessary. Once the dough has comes together add the softened butter, essence, and zest. Knead for about 10 minutes until the dough feels soft and elastic and visibly shiny. It should no longer stick to the surfaces. If needed add a few more tablespoons of flour. Finally, add the dry fruit and knead for about a minute until the fruit is distributed evenly.
- Bulk Proof / First Rise: Place the dough in a greased bowl and turn it over once to coat all sides with oil. Cover with plastic wrap (or a wet towel or a fairly tight lid) and allow the dough to rise in a warm place, about 1 hour and 30 minutes.
- Shape and Rise: Gently punch down the risen dough to deflate. Transfer to a floured work surface and pat down to a thick rectangle. Divide into 12 even pieces. Roll each piece to form a rope of about 14 to 16 inches in length. Take two ropes and twist them together. Loop the twist into a circle and interlace the ends and tuck them under. Transfer the circle onto a baking sheet lined with parchment paper. If making the filled circles, pinch off a piece from the rope before connecting the ends. Roll the pinched piece into a ball and place in the center. Cover with plastic wrap and set aside to double in size, about 30 minutes.
- Bake: Place the oven rack in the center. Preheat the oven to 350°F (170°C). Beat 1 egg with 1 tsp of water to make the egg wash. Use a pastry brush to coat the tops of the loaves with egg wash. If not glazing later, sprinkle sugar or decorative sprinkles on top. Place the colored raw eggs in the middle of the shaped circles. Transfer to the oven and bake for 20 to 25 minutes until the tops of the bread begin to brown a little. Transfer to a cooling rack.
- Glaze (Optional): Mix the confectioner’s sugar, vanilla extract, and milk/water to form a thick paste. Drizzle over the warm loaves. Decorate with sprinkles.
Notes
- Important: Nutrition Values are estimates. Actuals vary based on ingredients and serving size.